Home page: github.com/skramm/homog2d
This is the user manual for the current master branch of homog2d. For stable releases, see https://github.com/skramm/homog2d/releases .
To get the reference manual (requires Doxygen), you can either type $ make doc or $ doxygen misc/doxyfile (online here
If you are interested in code, check the page homog2d_devinfo.md.
Index is available here.
- Introduction
- Lines and points
- Other geometric primitives
- 2D transformation (aka homographies)
- Intersections and enclosings determination
- Misc. features
- Bindings
- Drawing things
- Numerical data types
- SVG import
- Technical details
- Runtime polymorphism
- FAQ
- History
1 - Introduction
All the code is in the namespace h2d, so either add using namespace h2d;, either use it as a prefix on each type (There are a lot of sub-namespaces, but unneeded for the end-user).
This library provides several main data types: lines, points, segments, circles, ellipses, polyline and homography matrices. These can be used to transform one of the basic types (planar transformation). It is implemented as a homogeneous 3x3 matrix.
All the data types implement a comparison operator ( == and !=).
This library does not provide exact arithmetic, it relies instead on basic floating-point types for storage and computations, but user can select the underlying type. The types are fully templated by the underlying numerical type. If more precision is required, an external library providing arbitrary binary size for numerical values can be used, see here.
To make things simple, we introduce here only the default type, based on double (see Numerical data types for details).
The API is exposed both as member functions and as free functions. Say for example you have a type AAA on which you can apply the foo() operation. Both of these are possible:
2 - Lines and points
2.1 - General usage
- Create or edit a 2D point: {C++}Point2d pt1; // 0,0Point2d pt2(3,4);pt1.set( 5, 6 );
- Create a 2D line: {C++}Line2d li1; // vertical line at x=0Line2d li2( 3, 4 ); // line passing through (0,0) and (3,4)Line2d li3( LineDir::H, 15 ); // horizontal line at y=15Line2d li4( LineDir::V, -2 ); // vertical line at x=-2
- For horizontal or vertical lines, you can also just provide a point, the constructor will handle it: {C++}Point pt(x,y)Line2d liH( LineDir::H, pt );Line2d liV( LineDir::V, pt );
- Create a point from two lines, and a line from two points: {C++}Point2d pt3( li1, li2 );Line2d li3( pt1, pt2 );
- Get a line from two points, and a point from two lines: {C++}auto pt = li1 * li2;auto li = pt1 * pt2;
Beware, two parallel lines will never cross, and two identical points do not define a line. So if your code attempts to do so, this will trigger a std::runtime_error exception.
If you are unsure, you can check first:
For the numerical considerations on this, check below, section Numerical data types.
- To get the euclidean coordinates of a point, two member functions are provided: Or use the equivalent free functions:{C++}auto x = pt.getX();auto y = pt.getY();{C++}auto x = getX(pt);auto y = getY(pt);
- To get the 3 components of a line as a homogeneous array, one may use: {C++}auto v = line.get();std::cout << '[' << v[0] << ',' << v[1] << ',' << v[2] << '\n';
But if its about printing, then the easiest is to use the overloaded operators:
(BTW: this is the same for all the other primitives, points and others).
- Compute distances from line to point or from point to point: {C++}Line2d li; // some linePoint2d pt1, pt2; // some pointsauto dist1 = li1.distTo( pt1 ); // distance from line to pointauto dist2 = pt1.distTo( li1 ); // but you can do this tooauto dist2 = pt2.distTo( pt1 ); // distance from point to pointLine2d li2;// auto dist = li.distTo( li2 ); // this does not build !
For points, you may also use the corresponding free function:
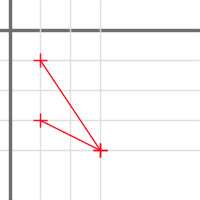
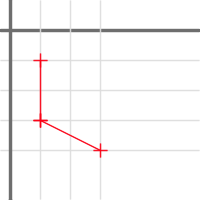
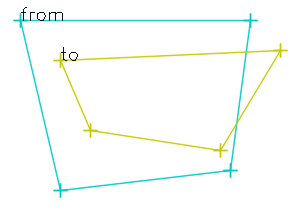
- You can compute the segment generated by a point and a line, using the shortest distance (see below:
This is illustrated on this figure, showing a rotating point and the computed orthogonal segment to a line (source):
Upon return, the first point will hold the intersection point (projection of point on line), and the second will hold the given point.
2.2 - Get point(s) lying on line
To get a point lying on a line, you can provide one of its coordinates and get the other coordinate value, using the enum GivenCoord. For example, if you build the line going through (0,0)-(4,2) with:
You can compute the coordinate of y for x=2 with:
or get the coordinate of x for y=1 with:
You can also get directly the point with:
Some care has to be taken with these functions, because they will throw if unable to provide a result. For example, if you try to get the 'y' coordinate from a vertical line, this will fail. The following code will throw:
2.3 - Points at equal distance from a point on line
You can compute the two points that are lying on a line and at a given distance from a point.
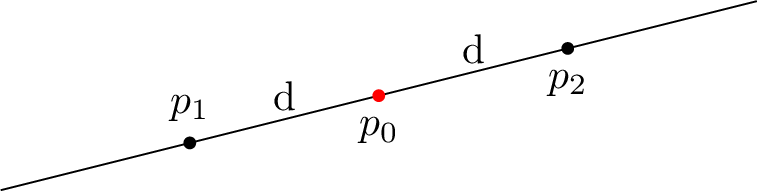
The API provides two ways to get these:
1 - either you provide the x or y coordinate of p0:
The drawback is same as the above paragraph: if line is vertical and you provide a 'x' coordinate, this will throw (and similarly with an horizontal line and a 'y' coordinate).
2 - either you provide directly the point:
The drawback is that you need to be sure that this point is truely on the line. This will be checked for, and library will throw if not (except if error checking is disabled, see build options).
Upon return, the "first" point will hold the one with smallest 'x' coordinates, or the smallest 'y' coordinates if x coordinates are equal.
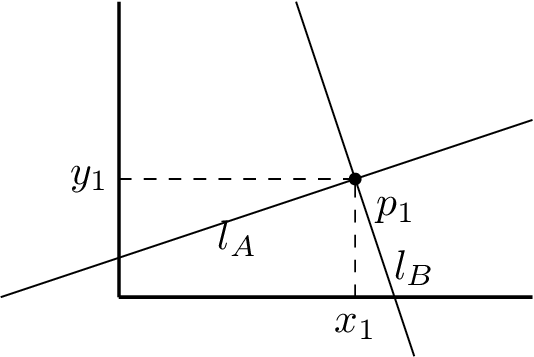
2.4 - Orthogonal and parallel lines, angles between two lines
You can compute a line orthogonal to another one at a given coordinate, using the above enum. For example, this:
will build lB so that it is orthogonal to lA at x=x1.
Similarly, you can also directly use as input a point on the line. But this time, the point does not need to be on the line:
You can get a line parallel to another one with the member function getParallelLine(). This function takes as argument a point that the line will intersect.
If you need a parallel line to another at a given distance, then you can use getParallelLines(), provided either as a free function or as a member function. They both return a pair (std::pair) of lines, one on one side, and the other on the other side of the input line:
If you know that two lines are parallel and you want the distance between them, then you have:
This will throw if lines are not parallel (unless error checking is disabled).
You can compute the angle in Radians between two lines, either with a member function or with a free function. Whatever the lines, the returned value will lie in the range [0-PI/2] (no negative angles):
You can rotate a line at a given point (must be lying on the line):
As lines are not oriented by design, positive and negative angles will achieve the same rotation Rotation by a value of M_PI (auto li2 = li.getRotatedLine( pt, M_PI );) will produce an identical line.
Any angle value above 90° (in the range [M_PI/2–M_PI]) will produce a line rotated by an angle of M_PI-angle
See demo here: https://godbolt.org/z/j3nT563P4
2.5 - Side of a point related to a line
The function side( Point2d, Line2d ); will return an int value, either -1, 1 or 0 if point lies on the line.
The tipping point is the horizontal line.
See showcase16 for an example.
2.6 - Homogeneous coordinates and infinity
As points and lines are stored with homogeneous coordinates, one can also build theses using 3 values:
It is also possible to initialize existing variables with homogeneous coordinates:
A container such as std::vector or std::array can be used too:
Storing points and lines with homogeneous coordinates allows us to handle points at infinity:
Such points can still be used, for example to build a line or a segment:
3 - Other geometric primitives
Besides points and lines, the following primitives are provided:
They all share some common member functions, see section 3.6.
The ones that may cover some area (polyline, rectangle, ellipse, circle) provide a function getBB() that returns a flat rectangle holding the bounding box. This is not available for points, lines, and segments (as a segment can be vertical or horizontal, it does not have an area).
On this figure, you can see a circle, a polyline and and ellipse, along with their corresponding bounding boxes. For the ellipse, you can get both the axis-aligned bounding box (shown in blue here), and the ellipse-axis aligned bounding box, shown in green.
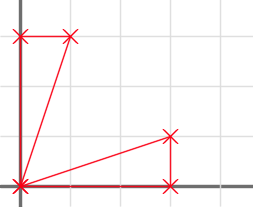
Besides these, you can also get the bounding box of two arbitrary primitives p1,p2, even of different types, with a free function:
On this figure, you can see three combinations of bounding boxes for some objects.
3.1 - Segments
This library provides two types modelling segments that both share the same underlying type (a pair of points), named Segment and OSegment The difference between them is that a OSegment is oriented, while a Segment is not.
Usage is straightforward, and is similar for both types:
You can also build theses by giving the 4 coordinates, x1,y1 and x2, y2 of the two points, that may even be of different types (float/double/...).
It can also be initialized (or set) with a pair of points:
Besides using a homography matrix, translating the segment can be done with a member function:
You can get the pair of points (as an std::pair) with getPts(). For type Segment, the points are stored internally with the "smallest" one as first (using x coordinate, or, if equal, using y coordinate). For type OSegment, there as stored "as is":
Many operations available with lines apply to segments too:
For angles, if one of the type is a line, or an unoriented segment, then the angle will stay in the range [0:+M_PI]. However, if both of the types are oriented, then the returned value will be in the range [-M_PI:+-M_PI].
Oriented segments can be reversed with the unary - operator:
For these, you can get the side of point relatively to the segment with getPointSide(). It will return a value of enum type PointSide, either PointSide::Left, PointSide::Right or PointSide::Neither if the point is on the supporting line. And you can get that as a human-readable string with the associated getString():
You can get the point lying in the middle of the segment:
For oriented segments, you can get a point at an arbitrary (positive) distance from the starting point:
This middle point can be used to split a segment into two equal length segments, returned as a std::pair:
Types are preserved: if the source segment is not oriented (Segment), then this will produce two non-oriented segments, il source is oriented (OSegment), this will produce two oriented segments, with same direction.
Similarly, you can split oriented segments at an arbitrary position, defined by a distance (but must be >0 and less than the length of the segment):
The bisector line is available, using a member or free function:
You can generates a std::pair of two parallel segments, lying at a distance dist, with:
See
for a demo.
The length is available with a member function or a free function:
The extended segment is available with a free of member function:
The extended segment has the same support line, but is "extended" on both sides with the length of the segment. Thus its length is three times the original segments length. On the figure below, the original segment is blue and the extended segment is red. The support line is gray.

You can fetch the orthogonal segments or points with getOrthogPts() and getOrthogSegs() (member or free functions). These two member functions return an std::array of size 4, the latter filled with the 4 orthogonal segments, and the first filled with the associated 4 points.
Due to the unoriented nature of the Segment type, these two member functions return points or segments in an unpredictable order.
The distance between a segment and a point can be computed. The code considers the different situations: shortest distance can be the orthogonal distance to the supporting line, or the distance to one the two points defining the segment.
This function has an optional second argument: a pointer to an int, that will hold upon return one of these three values:
- 0: distance is the orthogonal distance to the support line
- +1: distance is the one between point and smallest point of the segment
- -1: distance is the one between point and largest point of the segment
See showcase8 for an illustration.
3.2 - Flat rectangles
A flat rectangle is provided through the class FRect. It is modeled by its two opposite points.
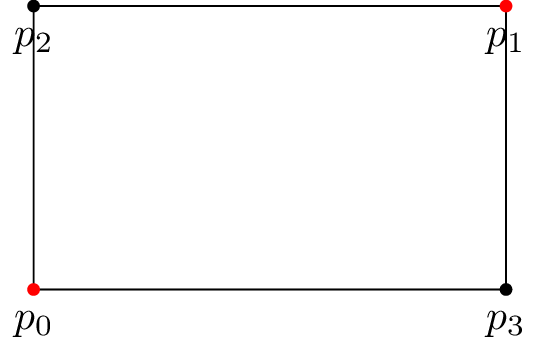
When using the constructor or the set() member function, there is no constraint on the points themselves: the library will automatically adjust the points to store the two opposite ones, with the one with smallest coordinates as "first".
This means you can give either (p0,p1) or (p2,p3), only p0 and p1 will be stored:
The only constraint is that no coordinate can be equal. The function will throw if it is not enforced.
You can also build the rectangle by giving the 4 coordinates x1,y1 and x2,y2.
Or by giving the center point and width and height:
Or by providing a std::pair of points:
You can get the points with two different member functions:
A call to the get4Pts() member or free function will return the points in the following order:
You can also fetch the 4 segments of the rectangle, with a member function or a free function:
The returned array holds the segments in the following order:
The two diagonal segments can be fetched as a pair of segments:
The first element will hold the segment holding the point with minimal coordinates (p[0] and p[2] on above drawing).
And of course, its width, height, length, and enclosed area. This is available through member functions or free functions.
It is possible to translate the rectangle using some dx,dy offset:
Full step rotation (+90°,-90°,180° or vertical/horizontal mirroring) is available with the rotate() member or free function:
This will proceed a rotation around origin point (0,0). But most of the times, you want to rotate around some specific point, so you can use this:
See related polyline function for details.
You can get both the the bounding circle and the inscribed circle:
The extended flat rectangle is available with a free of member function:
The extended flat rectangle will have an area 9 times the area of original rectangle.
The diagonal segments are available with a call to a member or free function:
The figure below shows the extended rectangle and the diagonals. red: the original rectangle, blue: the extended one, green: the diagonal segments, and gray: the supporting lines (source file).
Check this section about union and intersection area of two rectangles.
3.3 - Circles
These are modeled by their center point and radius. Creation is straightforward, whatever your needs:
Similarly, you can assign values to an existing circle:
You can also compute the unique circle from points, either from 2 points (that define the diameter), or from 3 points:
For these latter functions, the 2 (or 3) points must be different, and not colinear (for 3 points). This is checked for and will throw if not the case (unless the "no checking" build option is activated, see here).
Minimum Enclosing Circle (MEC)
To compute the Minimum Enclosing Circle of a set of points, you can use either a constructor, or the equivalent set() function:
See showcase13 for an example. It uses the Welzl algorithm, that require O(n) time and O(n) memory (recursive technique). The input container can be std::vector, std::array, or std::list. It requires a least 2 points in the container, and will throw if condition not met.
Center and radius can be accessed (read/write) with provided member functions:
Corresponding free functions are also provided:
You can get area and perimeter with member or free functions. The perimeter function has the name "length" for consistency with other primitives.
Two additional free functions provide the segment (or line) between the centers of two circles, and the two segments tangential to two circles:
3.4 - Polyline
This class holds a set of points and models an arbitrary set of joined segments, without orientation. It is available as two classes OPolyline_ (open) and CPolyline_ (closed).
The closed one automatically considers a connection betwen last and first point. It can be used to model a polygon.
3.4.1 - Building
It can be initialised either with a container (std::vector, or std::array, or std::list) holding the points, or (only for the closed version) from a FRect:
Another constructor enables building a Polyline from a Segment, wich ends up with a Polyline of 2 points:
Warning: you may not add a point identical to the previous one. Whatever the type, this code will throw:
An empty polyline is allowed, but the minimum number of points is 2, initializing with a vector holding 1 point will throw.
It has no orientation, meaning that the OPolyline build from this set of points:
(0,0)-(1,0)-(1,1)
will be identical as this one:
(1,1)-(1,0)-(0,0)
It is also possible to build a polyline by importing from a boost::geometry polygon (at present, only possible with the model::point point type). See an example here.
This requires the symbol HOMOG2D_USE_BOOSTGEOM to be defined.
Regular Convex Polygon
It is also possible to build directy a Regular Convex Polygon (RCP) by using a dedicated constructor. For example, this will build a RCP of 5 points, centered at (3,2), with the points at a distance 10:
For more on this, see the related set() function.
3.4.2 - Basic attributes
The open/close status can be read, but will return a constexpr value:
Both types provide access to basic attributes: number of points, number of segments, length and bounding box, all available as member or free functions:
3.4.3 - Extracting data
You can extract either points or segments. The number of segments is related to the open/close condition. For example, if we have 4 points, that will generate 4 segments if closed, but only 3 if the polyline is open.
3.4.4 - Bounding Box and Convex Hull
The getBB() member (or free) function returns the corresponding Bounding Box. this is demonstrated in the following figures for two Polyline objects, one closed, the other open.
On these figures is also shown the extreme points, Top-most and Left-most are green, the two others are blue. (see code here).
The convex hull of a Polyline can be computed with the member function convexHull(), see here for an example.
3.4.5 - Extremum points
You can get the top-most, left-most, bottom-most, or right-most point with these dedicated member functions:
Or use the getExtremePoint( CardDir ) member function and passing one of these:
For example:
These are also available as free functions:
(see misc. section for point set equivalent function).
Warning: These functions will throw if passed an empty polyline object.
3.4.6 - Distance between two Polyline objects
You can get the closest distance between two points belonging to two polyline objects with getClosestPoints() (free function). This will return an object on which you can fetch the corresponding pair of points, as indexes or as points, and the distance value:
See an example here.
3.4.7 - Type of Polyline
You can check if it fullfilths the requirements to be a simple polygon (must be closed and no intersections).
See definition here.
If it is, you can get its area and its centroid point:
source: polyline_centroid.cpp
Please note that if not a simple polygon, or if applied on a open type, then the area() function will return 0 but the centroid() function will throw.
For closed types, you can determine its convexity:
3.4.8 - Comparison of Polyline objects
Polyline objects can be compared, however the behavior differs whether it is closed or not. Consider these two sets of points:

If they are not closed, then the == operator will return false. But if they are (both) closed, it will return true, as they obviously describe the same polygon.
This is handled through a normalization step, called automatically.
- if "closed" type, the normalization will reverse and rotate the points, so that the smallest point is first and the second one is smaller than the last one.
- if "open" type, only the reverse operation is performed.
However, comparison of identical objects can fail in some circumstances, because a Polyline object can hold the same point several times (but not contiguous). Consider these two closed Polyline objects:
A: (0,0)-(3,0)-(3,1)-(0,0)-(0,3)-(1,3)
and
B: (3,0)-(3,1)-(0,0)-(0,3)-(1,3)-(0,0)
They both describe the same object:
When compared, they will be considered as different because they both use twice the same point (0,0) and their normalisation will produce these sets of points:
A: (0,0)-(3,0)-(3,1)-(0,0)-(0,3)-(1,3) (unchanged)
B: (0,0)-(0,3)-(1,3)-(0,0)-(3,0)-(3,1)
For more details, see homog2d_Polyline.md.
3.4.9 - Rotation/mirroring
All the primitives can be rotated using a homography (see following section), but in some situations you may only need "quarter-circle" rotations (mutiples of 90°). While it is of course possible to proceed these rotations with a homography, the downside is that you may end up with 0 values stored as 1.359 E-16, due to numerical nature of floating point computation. This can be undesirable, so an alternative is provided: You may rotate/mirror all the points of polyline objects with the rotate() member function. it takes as argument an enum value of type Rotate.
The available values are:
CW: -90° (Clockwise)CCW: +90° (Counter Clockwise)Full: 180°VMirror: Mirror points relatively to vertical axisHMirror: Mirror points relatively to horizontal axis
These operations are done relatively to the origin (0,0). If you need a rotation on a specific plane location, you may pass that location as second argument:
3.4.10 - Building a Parallelogram
The member function setParallelogram() takes 3 points (may be of different floating-point types) and builds the corresponding parallelogram by computing the missing 4th point. Is only available for "closed" type.
3.4.11 - Building a Regular Convex Polygon (RCP)
The member function set( dist, nb ) will build a Regular Convex Polygon of nb points, that will be at a distance dist from center. The center will always be (0,0), and the first point will always be at (dist,0).
If some translation is needed, you can use the translate() member or free function, see the related constructor.
This function returns a std::pair holding two numerical values: the distance between two consecutive points as "first", and "second" the radius of the inscribed circle.
The minimum value for nb is 3 (will generate an equilateral triangle), the function will throw if less.
3.4.12 - Offsetted polyline
For closed Polyline objects, the member function getOffsetPoly() can compute a new polyline at a given distance, by using parallel curves. Its argument is a distance (numerical value). If positive, the returned polyline will be "outside" the original one, if negative, il will be inside.
The source polyline must be "simple" (closed, and no intersections).
An optional second argument of type OffsetPolyParams holds a boolean value _angleSplit that can be set to true to "smoothen" the return polyline, by adding two points on sharp angles (applies only to "outside" computation).
See showcase 22
3.4.13 - Importing from boost::geometry
If the symbol HOMOG2D_USE_BOOSTGEOM is defined (see build options), you can import a Polyline from a boost Polygon type. See demo program that demonstrates that feature.
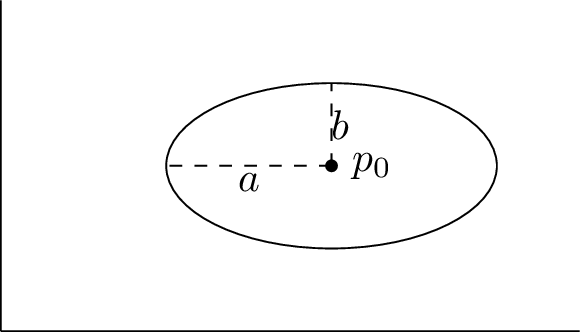
3.5 - Ellipse
We follow here the traditional parametrization of ellipses: center point, semi-major (a) and semi-minor (b) distances, and angle between main axis and horizontal axis. Internally, it is stored as a conic in its matrix form, see build options for details on how this is handled.
Warning: support for ellipse is only partial at present, several features available with all the other primitives may not all be available for this type
It can be build using several constructors:
```C++ Ellipse ell; // centered at (0,0), with null angle, major=2 minor=1 Ellipse ell2( x0,y0 ); // same as above, but centered at (x0,y0) Point pt( ..., ... ); Ellipse ell3( pt ); // same as above, but centered at pt Ellipse ell4( pt, major, minor, angle ); // all parameters given (angle has 0 as default value) Circle cir; Ellipse ell5( cir ); // can be initialized from a circle
Two functions are provided to get the bounding box: as with the others primitives, the getBB() member function returns the "flat" bounding box, while the getOBB() returns the "oriented" bounding box as a closed polyline object.
These are also available as free functions:
You can get the pair of axis lines:
To check if the ellipse is a circle:
(An ellipse will be a circle if a=b, but as it is stored in the matrix form, we check here if A=C and B=0.
This will use a threshold, but you can provide the one you want, depending on your applications constraints:
There is also a free function available:
3.6 - Common functions
All the types above share some common member functions. These are also declared as virtual in the root class Root. Thus, this enables classical pointer-based runtime polymorphism, see here.
All of these are const. The names of these functions are:
| Name | Return type |
|---|---|
size() | size_t (see below) |
area() | HOMOG2D_INUMTYPE |
length() | HOMOG2D_INUMTYPE |
type() | Type (see below) |
draw() | void |
The type() function will return an enum value of type Type having one of these values: Point2d, Line2d, Segment, OSegment, FRect, Circle, Ellipse, OPolyline, CPolyline. You can get a human-readable value ot the object type with getString(Type):
(This example might sound silly but it can be useful in real-time polymorphism situations.)
The return value of the size() member function is as follows, for the different types. They are declared as constexpr, except of course for the last two.
| Type | Return Value |
|---|---|
Point2d | 1 |
Line2d | 0 |
Segment | 2 |
OSegment | 2 |
FRect | 4 |
Circle | 1 |
Ellipse | 1 |
OPolyline | Nb of points |
CPolyline | Nb of points |
4 - Homographies
You can manipulate 2D transformations as 3x3 homogeneous matrices (aka "Homography"), using the class Homogr.
4.1 - Homographies for points
This can also be used with all the other types (Segment, FRect, OPolyline, CPolyline, Circle, Ellipse):
It must be noted that due to the inherent projective nature of a homography, applying to a flat rectangle will not produce a rectangle but a CPolyline. Similarly, applying a homography to a Circle will generate an Ellipse object:
4.2 - Homographies for lines
For lines, a known result is that if we have a line lA going through p1 and p2, and a homography H mapping p1 and p2 to p'1 and p'2, then the line lB joining these two points can be computed with lB = H^-T lA.
Since release 2.4, this library automatically handles this inversion, inside the class:
4.3 - Setting up from a given planar transformation
The three planar transformations (rotation, translation, scaling) are available directly through provided member functions. They are available in two forms: "`setXxxx()`" and "`addXxxx()`". The first one starts from the identity transformation and builds the requested one. The second form adds the requested transformation to the matrix.
- You can create a rotation or a scale transformation with one of these: {C++}Homogr h;h.setRotation( 3.14 ); // angle of PI radiansh.setScale( 2., 3. ); // discard previous rotation, and set horizontal scale factor to 2. and vertical to 3.
- You can build some complex transformation by multiplying these: {C++}auto h1 = Homogr().setTranslation(3,4);Homogr h2( 45. * M_PI / 180.); // 45° rotation matrixauto h3a = h1*h2; // first, rotation, then translationauto h3b = h2*h1; // first, translation, then rotation
- Or by calling dedicated member functions: {C++}Homogr h;h.addRotation( 3.14 ); // angle of PI radians (would be identical with "set")h.addScale( 2., 3. ); // add scaling transformationh.addTranslation( 0., 4. ); // add translation
- But you can also used "chained" syntax: {C++}Homogr h; // unit transformationh.addTranslation(3,4).addRotation( 45. * M_PI / 180.).addTranslation(-3,-4);
- You can access individual values of the matrix (read or write). This is needed if you want to set up some specific transformation (shearing, perspective, whatever): {C++}h.set( 0, 0, 3.14 ); // sets value at first line, first colauto v = h.get( 0, 0 ); // 3.14
To fill the matrix with arbitrary values, the best is to build it from a "vector of vectors", as in the example below:
You can also use std::array if needed.
- You can compute the inverse and/or the transpose of the matrix: (note: inversion is done by first computing its corresponding adjugate matrix.){C++}h.inverse();h.transpose();h.inverse().transpose(); // first, invert, second, transpose
- Once you have set up your matrix, you can apply it to points (or lines), using the
*operator:{C++}Homogr F; // set up some transformationPoint2d p1;Point2d p2 = H * p1; - You don't even need to create a variable, you can build one "on the fly" for translations and rotations: This is possible for all the primitives accepting a homography product.{C++}p1 = Homogr(50,100) * p1; // translationp2 = Homogr(M_PI/4) * p2; // rotation
- More complex stuff is possible too, without creating a variable: {C++}p1 = Homogr().addTranslation(50,100).addScale(2) * p1;
- You can apply the homography to a set of points or lines: This actually works with any other container on whom one can iterate, such as{C++}std::vector<Point2d> v_pts;... // fill with valuesh.applyTo( v_pts );
std::arrayorstd::list. - Or you may use the
*operator to achieve the same result:Thanks to templates, this works also for a set of points (or lines) stored in a{C++}std::vector<Point2d> v_in;... // fill with valuesauto v_out = h * v_in;std::listorstd::array.
Once you have the desired matrix, you can apply it to about anything you want. For example, here is a rotating polygon, with its bounding box and intersection points with a crossing line (see showcase3.cpp).
4.4 - Constructors
Four constructors are provided:
- one without arguments, that initializes the matrix to a unit transformation;
- one with one floating point argument, that produces a rotation matrix of the given angle value;
- one with two floating point arguments, that produces a translation matrix with the given values;
- the last one can be used to fill the matrix with a 2-dim container (
std::vector<std::vector<numeric_type>>orstd::array<std::array<numeric_type,3>,3>).
4.5 - Computing from 2 sets of 4 points
You can also compute the transformation from two sets of 4 (non-colinear) points:
For example, the following code:
will produce this matrix:
However, this requires the solving of a linear system of 8 equations with 8 unknowns (i.e. computing the inverse of a 8x8 matrix). This task does not enter in the scope of this library, thus we rely on others ones to do this. The consequence is that this feature is ONLY AVAILABLE if one of the two options below are available on system at build time.
The two options available are:
- Opencv (https://opencv.org)
- Eigen (https://eigen.tuxfamily.org/)
The default is Opencv, thus it will fail to build if not installed on system (check out bindings for more on this). However, if none of these are installed on you system, the easiest to install is with no doubt Eigen, as it is a header-only library.
The member function buildFrom4Points() accepts as third argument an int, 0 means using Opencv, 1 means using Eigen.
5 - Intersections and enclosings determination
5.1 - Intersections between primitives
This library has a homogeneous API for all intersections between the provided geometrical primitives. That is, whatever a and b (excepts points of course), there is a member function intersects() that both gives the answer to the question "do theses primitives intersect?" but also provides the intersections points.
If you are only interested in the first answer, you can write:
If you need the intersection points, then just store the returned value:
The number of intersection points will depend on the primitives, thus the access method (get()) will return different types. It will also throw if there is no intersection! And whatever the primitives, you can always get the number of intersection points with the size() member function.
The table below summarizes the number of intersection points to expect:
Line2d | Segment | FRect | Circle | Polyline | |
|---|---|---|---|---|---|
Line2d | 0 or 1 | ||||
Segment | 0 or 1 | 0 or 1 | |||
FRect | 0, 1, or 2 | 0,1, or 2 | 0-4 | ||
Circle | 0 or 2 | 0,1, or 2 | 0,2,4 | 0,1, or 2 | |
Polyline | 0 - n | 0 - n | 0 - n | 0 - n | 0 - n |
- For line-line and line-segment intersections, the
get()member function will return the unique intersection point, or throw if none. - For the other situations, the
get()member function will return astd::vectorholding the points (empty if no intersections).
For Polyline, the number of intersections is of course depending on the number of segments.
See the provided demo for a runnable example (relies on Opencv backend).
For the functions returning a pair of points, the returned pair will always hold as "first" the point with the lowest x value, and if equal, the point with the lowest y value.
For details on the algorithms involved, check this page.
5.1.1 - Details on intersections
When a segment has a point lying on another segment, such as in the figure below, this will be considered as an intersection point:
This has a consequence on rectangle intersections: when the rectangles are overlapping such as the figure below, we will have here 4 intersection points.
Similarly, in the situation as in the figure below, we will have 2 intersection points:
5.2 - Enclosing determination
This library provides an answer to the question: "is this object inside this other object?", whatever their type. In many cases, the question doesnt really make any sense (a point cannot be inside a point, nor can a line be inside a segment), but to have a homogeneous interface, the code a.isInside(b) will always compile. In the nonsense situations described above, it will simply return false (as a constexpr value).
Note: these functions use a strict condition: if point is on an edge, it will not be considered as inside the other object.
The table below summarizes what type (lines) can be used to check if it is inside another object of same or different type (columns).
- F: (constexpr) false
- T/F: true or false
- NI: Not Implemented (yet), returns false
| Point2d | Line2d | Segment | Frect | CPolyline | OPolyline | Circle | Ellipse | |
|---|---|---|---|---|---|---|---|---|
| Point2d | F | F | F | T/F | T/F | F | T/F | T/F |
| Line2d | F | F | F | F | F | F | F | F |
| Segment | F | F | F | T/F | T/F | F | T/F | T/F |
| FRect | F | F | F | T/F | T/F | F | T/F | T/F |
| CPolyline | F | F | F | T/F | T/F | F | T/F | T/F |
| OPolyline | F | F | F | T/F | T/F | F | T/F | T/F |
| Circle | F | F | F | T/F | T/F | F | T/F | NI |
| Ellipse | F | F | F | T/F | T/F | F | T/F | NI |
5.3 - Union and Intersection area of two rectangles
You can compute the rectangle corresponding to the intersection of two (flat) rectangles: one can use either the intersectArea() member function or (same name) free function, or the & operator. This will return an object that can be checked for with the () operator (returns a bool). It will return false if there is no intersection.
For the union of two rectangles, the usage is similar, but it will return a (closed) Polyline object. You may use either the unionArea() (member or free) function, or the | operator. And there is no get() function, as you will always get a valid Polyline object.
Additionaly, the getBB() free function returns the bounding box holding the two rectangles, as shown in gray in the two examples below.

Note that we may not have an intersection area even if there are some intersection points found, because these can be due to a shared segment, or a single intersection point.
For the union, if there is no intersection, the function will return an empty CPolyline object.
If one rectangle is inside the other one, then the union will return the largest rectangle (as a Polyline object), ant the intersection will return the smallest one.
For conveniency, a function IoU() is provided. It computes the ratio of the area of the intersection of two rectangles over the area of the union of these two rectangles. See this WP page where this is described. This page from OpenCV also provides all the details.
6 - Misc. features
6.1 - Convex Hull
You can compute the convex hull of a set of points that are stored in a standard container (std::vector, std::list, or std::array) with the convexHull() free function. This function will return a CPolyline object. This function can also take a Polyline (CPolyline or OPolyline) object as input:
| CH of a set of points | CH of a Polyline |
|---|---|
Convex hull of a set of points |
Convex hull of a polygon |
6.2 - Bounding Box of a set of objects
You can compute the Bounding Box of a set of objects that lie in a container, whatever that container type (std::vector, std::list or std::array). This function will return a FRect object:
This function will throw if the returned rectangle ends up in an invalid state. This means that for points or segments, the container's size needs to be at least 2. For polylines, circles and rectangles, the size needs to be at least 1.
However, as the returned rectangle may not have a null area, this function will throw if the container holds objects on which no bounding box can be defined. For example, if the container holds 3 identical points. Or even different points, but sharing a identical x or y coordinate (think: [0,0]-[0,5]) The same situation may occur with segments, for example a container holding these two segments: [0,0]-[0,5] and [0,10]-[0,20].
Examples (generated with this file):
For points, the Top-most and Left-most point are shown in green, and the Right-most and Bottom-most points are shown in blue (see next section about this).
Note: this function also works for containers holding "variant" type objects (CommonType), see RTP section. For example, this figure shows how you can detect the bounding box of a set containing variant-based primitives, generated with this file:
6.3 - Extremum points
Given a set of points in a container (std::vector or std::array), you can get the Top-most / Bottom-most / Left-most / Right-most point with a simple call to one of these:
All these function actually return a pair of values, the first element being the point itself, and the second holds the distance from beggining of container (index).
Or use the generic function with a CardDir value (see here for that enum definition).
see here for Polyline equivalent functions
For an example, see previous section.
6.4 - Colinearity of 3 points
You can check if three points lie on the same line with this:
6.5 - Finding nearest/farthest point in a container
Say you have container (std::vector, std::list, std::array) holding a bunch of points. Three functions allow you to find among these wich one is the closest or the farthest to a given point.
If you need to get both:
(or you could of course call the two previous function sequentially.)
Please note:
- These functions will throw if the container is empty or holds only one point.
- If the query point is equal to one of the points in the container, these function will still return the nearest/farthest of that point.
6.6 - Extracting data from sets/containers of primitives
If you have a container (std::vector, std::list or std::array) holding either segments, circles or ellipses, you can get at once all the center points, grouped in a vector:
Similarly, if you have a container holding segments, you can get at once all the supporting lines:
6.7 - Finding points inside a shape
If you have a container (std::vector, std::list but not std::array) holding a set of points, you get can fetch the set of points lying inside a primitive with the free function getPtsInside():
The only primitives allowed are the ones having an area (FRect, Circle, CPolyline) and Ellipse). Using others will fail at build time. The returned type will be the same as the input type (vector/vector or list/list)
Examples (generated with this file):
7 - Bindings with other libraries
Besides the type conversions described here, a more general binding is provided with the ttmath library. It allows increasing range and precision of numerical values. See here for details.
7.1 - Generic type conversion
Import from other types is pretty much straight forward. For points, a templated constructor is provided that can be used with any type having an 'x' and 'y' member. For example, say you have a point type:
Then you can build a point (or a line going through (0,0) and that point) with:
But in case your type uses other identifiers than x and y, no problem: just define the symbol HOMOG2D_BIND_X and HOMOG2D_BIND_Y with the ones you use and the above code will be ok.
For homographies, you can import directly from std::vector<std::vector<T>> or std::array<std::array<T,3>,3>.
For the first case, it is mandatory that all the vectors sizes are equal to 3 (the 3 embedded ones and the global one).
7.2 - Generic conversion into other types
For points, as long as the other type provides a 2-args numerical constructor, you can easily convert a h2d::Point2d into these, for example:
This is also possible for a std::vector:
7.3 - Data conversion from/to Opencv data types
Optional functions are provided to make interface with Opencv easier. These features are enabled by defining the symbol HOMOG2D_USE_OPENCV at build time, before "#include"'ing the file. You can then write this:
This is also available as free functions:
Reverse operation as simple as this:
(works the same for cv::Point2f and cv::Point2i)
Similarly, you can build a line using Opencv points:
This also enables conversions between matrices types. You can build a homography using a provided cv::Mat:
7.4 - Binding with Boost Geometry
From release 2.10, a preliminar binding is provided with Boost Geometry. It can be used to import Boost point types, or boost polygons. This is made available by defining the symbol HOMOG2D_USE_BOOSTGEOM.
You may build a point using either of the two point types:
The Cpolyline and OPolyline types have a constructor that takes a Boost polygon as argument. See a demo in this file.
Exporting of points to the Boost point types is also possible, if that latter type is Cartesian and has 2 dimensions (free or member function):
8 - Drawing things
This library provides a way to render data graphically, using two backends. However please note that this is not a "high-end" drawing tool, the rendering has no extended fine-tuning on how things are rendered, the goal is only to quickly see what is going on.
8.1 - Available backends
The user can select between two backends, both can be usable at the same time. They both are accessed through the templated datatype Image, lying in the sub-namespace img.
The two concrete types that can be used with Image are either img::SvgImage, to generate a SVG file, or Opencv cv::Mat type, that requires that the symbol HOMOG2D_USE_OPENCV is defined and that the library is installed on system.
The difference between these two backends is that with SVG, you may only generate a file; with OpenCv, you can build an interactive app, through the "HighGui" part of that library, whith mouse and keyboard callbacks. This is demonstrated in a provided demo program that you can try with:
This requires that Opencv is installed on your machine. In case you have some trouble building this program, please read this.
To have an idea, here are two renderings of the same objects done with the two backends (done with this program.)
| SVG rendering | OpenCv rendering |
|---|---|
SVG drawing | 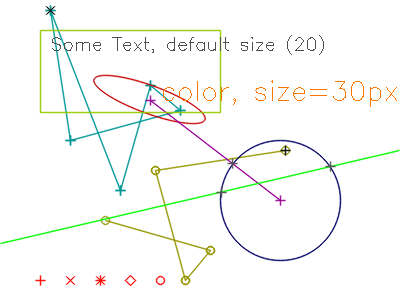
Opencv drawing |
With both types, you can store the generated image with the write() member function (see examples below). A streaming operator is also provided for the SvgImage type, so you may use it to stream on std::cout (or a previously opened file) in your app to check the output, and redirect to a Svg file:
8.2 - Drawing objects
Generic drawing member functions are provided for all the types. For example, creating a SVG file in current folder, holding a circle:
Same, using Opencv to create a png file:
A corresponding free function is available, can be used for any type:
If you use Opencv, you might need the cv::Mat object for other tasks. It is available with the getReal() member function that returns a reference on that object (const or not):
8.3 - Drawing Text
You can draw text with the drawText() free or member function, with either Opencv or Svg backend:
8.4 - Drawing parameters
All these drawing functions (member and free function) support an additional optional argument of type img::DrawParams, also back-end library independent. that holds various parameters for drawing. It holds several member functions that allow to tweak the drawing parameters. All of these functions support the "chained-call" syntax.
So you can for example set the color and line width with:
with r,g,b as bytes (uint8_t) in the range [0,255].
A local type holding these 3 values can also be used:
The drawing parameters default values can be changed anytime with a call to setDefault(), and values will be retained, unless explicitely changed, as showed in the example below;
You can at any time return to the "factory" settings with a call to a static function:
You can also save a style in a variable, to avoid lengthy lines:
The available functions are given in the table below:
| Function | Arguments | Comment |
|---|---|---|
setColor() | 3 ints ([0-255]) | |
setColor() | img::Color | |
setPointStyle() | enum PtStyle: Plus,Times,Star,Diam,Squ,Dot | |
setPointSize() | 1 int (pixels) | odd number required |
setThickness() | 1 int (pixels) | |
showPoints() | bool (default is true) | Draws the points for Segment and Polyline types |
setFontSize() | int (size in pixels) | Only used for drawText() |
The following table shows the rendering of the different point styles (PtStyle) and several point sizes, with the OpenCv and SVG backend, with width (setThickness()) set to 1 and 2.
| width | png (OpenCv) | Svg |
|---|---|---|
| 1 | 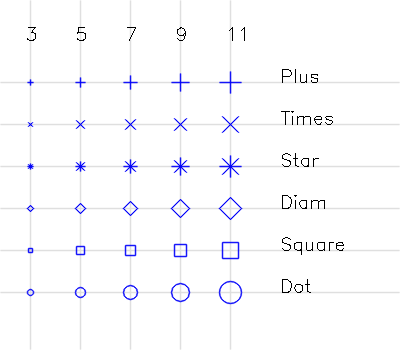
demo_pt |
demo_pt |
| 2 | 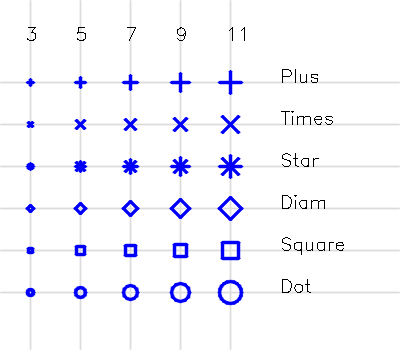
demo_pt |
demo_pt |
For Svg back-end only, the user can add some specific Svg attributes with setAttribString(). For example:
Make sure you add valid attributes, check here.
html img/demo_svg_attrib.svg "demo_svg_attrib"
For Opencv back-end, this is ignored.
8.4 - Drawing containers
If you have a container (std::vector, std::array or std::list) filled with one of the primitives or a std::pair of primitives (can be different types), you can draw them at once with a call to the same free function draw():
For containers, a second generic function is provided that has as third argument a std::function. This is useful to enable having different drawing properties (think: color) for each element of the set:
The passed function must return a valid img::DrawParams object. It may be build depending on the index of the object.
A typical example would be:
Checkout here to see an example. A helper function img::genRandomColors() is provided, it will return a vector of img::Color objects filled with random RGB colors. For example:
You can then use these with the setColor() member function:
8.5 - Drawing containers holding variant objects (runtime polymorphism)
If the build time option is enabled (symbol HOMOG2D_ENABLE_VRTP), you can draw at once all the objects in a container holding "variant" types
You can also pass an optional third parameter of type DrawParams.
See example
9 - Numerical data types
9.1 - Underlying data type: standard library floating point types
The library is fully templated, the user has the ability to select for each type either float, double or long double as underlying numerical datatype, on a per-object basis.
The default datatype used for all the primitives (Point2d, Line2d, Homogr, Segment, OSegment, FRect, Circle, Polyline, Ellipse) is double. The other types can be selected by an additional suffix letter added after the type:
F for float, D for double and L for long double.
For example: Point2dF, Line2dF or SegmentF are float types.
If you prefer the classical template notation, it is also available by adding an underscore after the type:
However, this only applies to storage. All the computation (distances, angles, intersections, ...) use (and returns) the type defined by symbol HOMOG2D_INUMTYPE, that defaults to double.
If you need extra precision (and if your compiler supports it), you may configure the library to use long double by adding this before the "include":
or add that as a compile flag: "-DHOMOG2D_INUMTYPE long double" ...
(don't forget the quotes!)
Numerical type and size access
For any object, you may know its underlying floating-point type with the dtype() (member or free) function. It will return an enum value of type Dtype, either Dtype::Float, Dtype::Double or Dtype::LongDouble.
It can be printed out for humans with getString(), this will print "Float":
You may also check the size in bits of corresponding mantissa and exponent with the (member of free) function dsize() (assuming IEEE754 implementation). It will return a std::pair of integers, the first being the size of the mantissa, the second being the size of exponent.
(Also works for "big numbers", see below ).
9.2 - Numerical type conversion
It is possible to convert to/from an object templated by a different type (at the cost of a potential precision loss):
9.3 - Numerical issues
For the tests on null values and floating-point comparisons, some compromises had to be done. As you may know, the concept of "equal floating point values" is very tricky. In this library, this can hurt in several ways:
- creating a line from two points will fail if the points are equal,
- similarly, computing a point at the intersection of two lines will fail if the lines are parallel.
This library will ensure these conditions, and will throw an exception (of type std::runtime_error) if that kind of thing happens. The thresholds all have default values. They are implemented as static values, that user code can change any time.
More details and complete list on threshold page.
9.4 - "Big numbers" support
From release 2.10, there is a preliminar support for the ttmath library, that enables selecting the number of machine words for both mantissa and exponent. This can improve both precision of computation and maximum size of numbers, as it can extend the maximum size allowed by the standard type long double. This library is header-only, so it's very simple to install.
To enable this, you need to define the symbol HOMOG2D_USE_TTMATH. This will also define a default value for HOMOG2D_INUMTYPE (homog2d internal numerical type) as ttmath::Big<2,2>. This definition means that both mantissa and exponent will be stored as 2 machine words. On a 64-bit platform, that will end up as 128 bits for both.
This can be overridden,
- either by another definition of
HOMOG2D_INUMTYPEas default types. For example, to have 2 machine words for exponent and 3 for mantissa as default, you can add this on top of your file (before the#includeline):{C++}#define HOMOG2D_INUMTYPE ttmath::Big<2,3> - or individually for each object. For example: {C++}Circle_<ttmath::Big<4,1>> circle;
The downside is that once the symbol HOMOG2D_USE_TTMATH is defined, you cannot use anymore the "standard types" (float, double, long double).
See this file for example.
Please note that you will probably need to adjust the relevant thresholds according to you choice of precision, see the threshold page.
For more on how this is handled in the code, see here.
10 - SVG import
10.1 - Requirements
A minimal SVG import code is present, it relies on the well-known tinyxml2 library, thus it needs to be present on machine to build an application using this feature.
On Debian-based distros, this can be easily done with $ sudo apt install libtinyxml2-dev
To enable its usage in your code, you need to do two things:
- define the symbol
HOMOG2D_USE_SVG_IMPORTbefore includinghomog2d.hpp - add the library to the build process. That can be done by adding this to the linking command-line: (double the$(pkg-config --libs tinyxml2)
$if in a makefile)
10.2 - Example
Importing is pretty simple: Instanciate a Tinyxml XMLDocument object, and use it to read the file. Then create a "visitor" object, and fetch a vector of the objects in the file:
The latter function returns a vector of polymorphic objects CommonType. This is a wrapper around a std::variant, on which the library provides some helper functions. See RTP section on how to use this. This polymorphic behavior is kept optional, it is enabled only if symbol HOMOG2D_ENABLE_VRTP is defined (which is automatically done if HOMOG2D_USE_SVG_IMPORT is defined).
For safety, you can check if the file has been correctly read by testing the return value of the LoadFile() member function:
You can fetch the size of image in the SVG file (as double) with getImgSize(). However, this will throw if no size can be found, so you might consider using that in a "try/catch":
10.3 - Technical details on svg file import
When importing a SVG file, the following points must be considered:
- All the color, style,etc. Svg attributes present in file are lost, as this library does not store them.
- All groups (
<g>tags) are ignored. - Svg has no "line" object, what is called a line is actually a segment and it will be imported as such.
- Svg has no "point" object, thus it cannot be imported. However, if you try to import a file that was created with the Svg drawing subsystem, points will be plotted with a shape defined by its parameters.
- Svg has two ways to define a polyline (or polygon): either with the dedicated keywords (
polylineorpolygon), or by using thepathelement, that is much more general. This import subsystem handles all three of these. However, for the "path", the "curve" elements (SVG path commands C, S, Q, T) are not handled, the import code will just ignore those SVG commands if encountered while importing a SVG path object. - When importing a SVG "path", it will be automatically converted to a
CPolylineor aOPolyline, depending on the fact that it holds azat the end of the SVG path "d" string. - If you have trouble with some SVG file, a helper function
printFileAttrib()is provided that will output all the SVG attributes of a file onstdout. See an example of its usage in file demo_svg_import.cpp.
SVG Reference: https://www.w3.org/TR/SVG2/shapes.html
10.4 - Demo
If you have cloned the whole repo and have Tinyxml2 installed, you may build a demo program with:
$ make demo-import
This will build the file BUILD/demo_svg_import (source here) that will import any SVG file, print its content on screen (SVG general attributes and number of shapes), and generate another svg file demo-import.svg in current folder.
For example:
$ BUILD/demo_svg_import docs/img/comparison_1.svg
The previous line imports a file that has been generated by this library, so to have something more realistic, you can run this:
$ BUILD/demo_svg_import misc/test_files/France.svg
This will produce this image, with the bounding boxes of the different regions drawn with different colors:
11 - Technical details
- The two types
Point2dandLine2dare actually two typedefs of classbase::LPBase, behavior differs due to some policy-based design. Similarly, the typesCPolylineandOPolyline(Closed and Open polyline) are specializations of the root classbase::PolylineBase. Same with the two typesSegmentandOSegment, that are a specialization of classbase::SegVec - Points are stored as non-normalized values, except for the sign: the first value will always be positive. So the point
[-1,1,1]will be automatically converted to[1,-1,-1]. Besides that, any computation will keep the resulting values. - Lines are always stored as normalized values (a^2+b^2 = 1)
- Homographies are stored as normalized values, either as h33=1, or (if null) as h23=1, or (if null) as h13=1
For more details on the code, check this page.
11.1 - Testing
A unit-test program is included, can be run locally and is also used by GitHub CI. It is uses the Catch2 library. The Github CI (aka "Github Actions") loads the 2.13.6 release. It is build and run with $ make test The CI launches the tests with both Ubuntu 20 (gcc9.4) and Ubuntu 22, and also makes sure that the Microsoft C++ compiler is able to build the software (but it does not run the tests with it).
If you have Opencv installed on your machine, you can run the additional tests that make sure the Opencv binding stuff runs fine by passing make option USE_OPENCV=Y:
Similarly, if you have Tinyxml2 installed, you can run the additional SVG import tests by passing this flag:
A second test target is included: $ make testall. It will build and run the tests programs 3 times, one for each numerical data type (float, double, and long double), through the symbol HOMOG2D_INUMTYPE.
The test target also attempts to build the files in the folder misc/no_build. These demonstrate some code that should NOT build, thus Make will fail if any of these does build. This is just to make sure that some invalid code does, indeed, not build.
Timing Using the Catch v2 library has a small drawback: build time is pretty long (but will succeed!). For example:
See some additional details on "dev" page
11.2 - Build options
Below are some options that can be passed, to activate them, just define the symbol. You can do that in the makefile by adding -DHOMOG2D_SYMBOL to the compiler call options, or just add a #define on top of your program before the #include "homog2d.hpp"
11.2.1 - Build symbols related to bindings with other libs:
HOMOG2D_USE_OPENCV: enable the Opencv binding, see Bindings.HOMOG2D_USE_EIGEN: enable the Eigen binding, useful if you need to compute a homography from points and Opencv not available (see here).HOMOG2D_USE_SVG_IMPORT: enables importing from svg files, requiresTinyxml2library, see SVG import.HOMOG2D_USE_BOOSTGEOM: enables the binding with Boost::geometry (preliminar), see example here.HOMOG2D_USE_TTMATH(preliminar): this will enable the usage of the ttmath library, to increase numerical range and precision. See here for details.
11.2.2 - Other build symbols:
HOMOG2D_NOCHECKS: will disable runtime checking. If not defined, incorrect situations will throw astd::runtime_error. If defined, program will very likely crash in case an abnormal situation is encountered.HOMOG2D_NOWARNINGS: on some situations, some warnings may be printed out tostderr(see below). Defining this symbol will disables this. Besides this build symbol, user code can silence all the warnings witherr::printWarnings() = false;(can be reactivated any time by passingtrue).HOMOG2D_OPTIMIZE_SPEED: this option may be useful if you intend to to a lot of processing with ellipses, and you favor speed over memory. The default behavior for classEllipseis to store only the homogeneous matrix representation (conic form),to minimize memory footprint. This drawback is that every time we need to access some parameter (say, center point), a lot of computations are required to get back to the "human-readable" values. With this option activated, each ellipse will store both representations, so access to values is faster, but memory footprint will increase. For more on this, see this page.HOMOG2D_ENABLE_PRTP: enables pointer-based runtime polymorphism. This will add a common base classrtp::Rootto all the geometric primitives, see RTP section.HOMOG2D_ENABLE_VRTP: enables variant-based runtime polymorphism. This will add a classrtp::CommonTypeholding all the geometric primitives as a std::variant. See section RTP for details.HOMOG2D_DEBUGMODE: this will be useful if some asserts triggers somewhere. While this shoudn't happen even with random data, numerical (floating-point) issues may still happen, read this for details.
12 - Runtime Polymorphism
12.1 - Introduction
Runtime Polymorphism is the ability to store in a container (std::vector, std::list, ...) objects of different types and calling on those elements some free or member function. With this library, this is implemented using two different techniques, one with the classical pointer-based approach, and the other using a std::variant, enabled by upgrading to C++17.
At present, these two techniques can be used, they both have pros and cons, but the pointer-based approach might be shortly deprecated, So it is advised to use nowadays the "variant-based" technique, as it is more type-safe. And there is no feature available with the other approach that isn't available with the variant-based approach.
12.2 - Pointer-based runtime polymorphism
This is the "classical C++" technique: you store (smart)pointers of type Root in the container. All the geometric primitives will inherit from this (non-templated) class. That class (and its inheritance) will only exist if the symbol HOMOG2D_ENABLE_PRTP is defined:
You may then call one of the polymorphic member functions on each of them:
Remarks:
- You may directly call the streaming operator (
<<), theRootclass takes care of redirecting to the correct class operator. - Notice that in this code, if the object is detected as a line, the function length is not called. This is mandatory to avoid throwing an exception, as a line cannot have a finite length.
To do something more elaborate, you need to convert them using a dynamic cast:
At present, the only polymorphic member functions available:
void draw( img::Image& )(you may pass as second argument aimg::DrawParamsobject)double length()double area()
Potential pitfall: there is no checking on the correct cast operation, it is up to the user code to make sure to cast the pointer to the correct type. Bad casting will very probably lead to a segfault.
Check test file homog2d_test_rtp_1.cpp for an example.
12.3 - Variant-based runtime polymorphism
This feature is made available by defining the symbol HOMOG2D_ENABLE_VRTP. This will enable a templated common type CommonType_ that holds all the geometrical primitives, as a std::variant (requiring a move to C++17). It follows the naming conventions of primitives, so you can use CommonTypeF, CommonTypeD or CommonTypeL, with CommonType defaulting to HOMOG2D_INUMTYPE (double by default).
So you can now stack up different primitives in a container of that type:
To get the actual type of the object, you can call the free function type(), see here.
A set of functors to be used with std::visit() is available, lying in the fct sub-namespace (see here). But the easyest is probably to use the associated free functions, so you don't have the hassle of functors.
For example, with the above vector, you can print their type, length and area with:
(warning, the length() function will throw here if a Line2d is in the vector).
To draw these on an img::Image, you can do this:
Or, much simpler:
To apply the same homography on each element (and store them in-place), simple as this:
But you may also use the associated functors and std::visit() if you prefer:
If you need to get the object as its base type, a dedicated functor is provided:
Checkout all the default functors here, and the list of free functions that handle basic types or variant types (CommonType) here.
Check test file homog2d_test_rtp_2.cpp for an example.
12.4 - Pros and cons of the two techniques
- With the "variant-based" technique, a constraint is that all elements of a vector of
CommonTypewill share the same underlying floating-point type. This constraint does not stand with the "pointer-based" technique. - With the "pointer-based" technique, adding another (user) virtual function is quite complicated. As opposed to the "variant-based" technique, where it just requires writing a function in user code, that call the
std::visit()function.